
The development of printer technology is currently
growing rapidly. Especially now that it's easier for you to get a printer with
various functions, such as photocopying, scanning and also ADF. Of course, the
price offered for each of these printer products will be adjusted to the
functions and facilities they have. The more sophisticated the printer you
want, the more expensive the price.
Before you decide to buy and use a printer, try to understand all the
functions of that part of the printer. This is done to provide comfort in
using the printer for a longer period of time. One of the printers that you
need to understand is the printer ink disposal section or often referred to as
waste ink. The system applied in this section will indeed differ from each
brand and type.
The main function of the printer ink drain section
One part of this printer is quite important. Especially if you use a printer
that has an inkjet system or printing with ink printing materials. The main
function of this section is to be a place to dump dirty and unused ink during
the printing process. Usually the more files you print, the more unused ink
will be thrown away. It also depends on the character of the printed file, and
more.
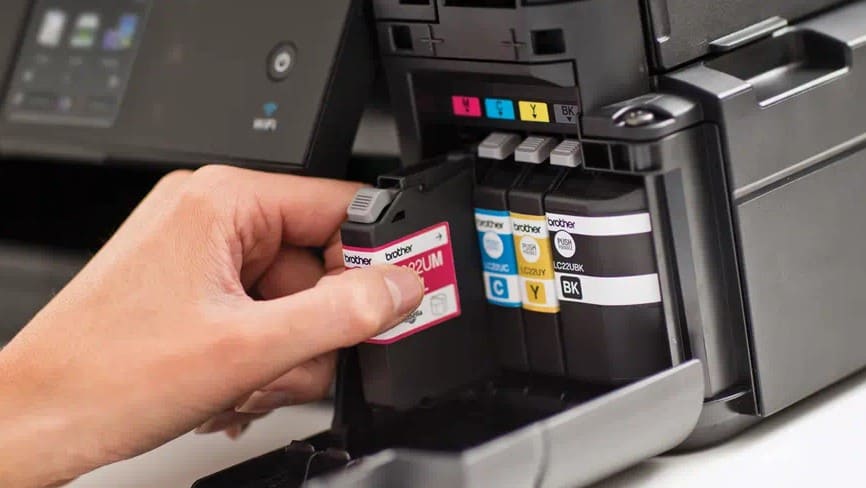
You also have to remember that all printer manufacturers of course have an ink
drain section, but these drains have various sizes, and are usually small in
size. This often happens with old series inkjet printers such as many canon
printers such as the MP287, iP2770 and many other printers, but even though
the ink absorption foam is small, it is strong enough to withstand ink
draining with a large capacity.
However, on some types and models of printers usually offer a dump that has a
layer of layered sponge. Usually this layer will hold all the ink that is not
used during the printing process. Of course the storage capacity of this
sponge is also limited. If you use this printer too often, the capacity of the
ink in the sponge will also get full more easily.
For printers that have a sophisticated system, they will give a special
notification that the condition of the ink dump through the sponge when it is
full. All you have to do is replace the sponge with a new one. Make sure that
the quality, size and character of the sponge used is also in accordance with
the disposal area provided.
 |
Printer ink drain section for infusion method
In some cases, the method of replacing the sponge that is placed for the
disposal site must be carried out periodically. However, this method usually
takes a long time. Moreover, the location or placement of the unused ink dump
is also on the inside (on the old printer series) so in the process you have
to disassemble it to reach the ink disposal box and clean/replace the sponge.
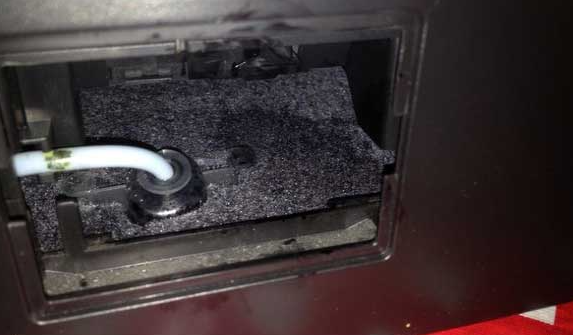
But there is also the latest Epson inkjet printer series that has a dumpster
on the back that is easy to replace and remove (as in the picture above).
Another recommendation that you can do is to add a special place on the back
of the printer. This method is usually applied by adding a special hose that
is placed in the ink drain box. The installation system required is usually
almost the same as that of infusion ink.
However, the installation method that
is applied must also be adjusted to the model and condition of the printer as
well.
If you prefer to use a hose connection on the ink drain, it's actually more
efficient than having to constantly replace the ink drain foam, but it's
better if you find the right place when adding a hose for the drain to the
outside of the printer unit. so there is no risk of clogged hoses, dead ends,
and other problems.
Equipment preparation
The first thing we need to prepare is equipment to make waste ink. Some of them are:
- Screwdriver to open the cover
- Small hose
- Any waste disposal tube/bottle is allowed as long as the bottle is empty
- Washcloth/Tissue
- Lapban
- Nail
- Fire / Matches
Creating Ink Drain
The first step to dispose of ink is to open the back of the printer cover, use a screwdriver to open the back. Each printer has a small box behind the printer that can be opened.
Next, look for the small white hose that is behind the printer after opening the cover. If you have found this tube, pull it out slowly and be careful not to splash the remaining ink.
Also, don't pull it too hard, because it could come off the rolling part, because if it comes off, you have to disassemble the printer to put it back together. Attach this ink waste hose to the new hose that you have prepared. See also Fixing general errors.
Continue by making a small hole in the bottle cover, you can use a burnt nail then press it on the bottle cover so that the hole is neat. You can use a soldering iron or drill if you have one that is the right size for the hose.
Insert the hose that was attached to the printer into the bottle. Attach the bottle to the wall or to the printer body.
We have succeeded in removing the ink, now is the time for you to do a test, whether the ink disposal runs smoothly and the results enter the bottle.
Short video example of Epson printer ink dump foam
How to clean the printer ink drain
There are several ways and methods that you can do to clean this part of the
printer ink disposal. The system is also quite simple. Here are some easy
steps to clean that part of the drain such as:
- Open the ink drain case: The first thing you have to do is to open the ink drain casing. Try opening it with a screwdriver that fits the bolts on each side.
- Remove the ink drain: Gently open the casing. Next, remove the ink drain. Never turn the printer over when removing.
- Clean the sponge: Next clean up sponge by washing and then leave to dry.
- Reinstall the sponge: Make sure that you have reinstalled the sponge.
- Return the ink dump to its original position: After that, reinstall the ink sink as it was before.
Exhaust Testing
Now that we have successfully removed the ink, is it going well?
To find out, you can do a test by printing several sheets of documents or photos, or by doing head cleaning several times on the Epson or Canon printer that is being made.
Conclusion
Printer ink waste usually only lasts 6-1 years, if the printing is smooth and frequent then the waste ink will quickly fill up causing printer errors and of course if it is not cleaned it will cause ink leaks which will damage your work desk with ink spilling everywhere.
Making printer ink disposal is the best solution so that the ink doesn't leak anywhere and is easy to clean. Just throw away the bottle or clean the bottle and the printer ink waste is ready rather than having to buy waste foam which drains our pockets a lot.
Apart from that, exhaust ink that is full in the printer can also cause an electrical short circuit causing internal damage to the printer.
That's the information that erzedka.com can share about a little
information about the disposal of printer ink, of course you need to know this
too, it's impossible for the ink to be channeled perfectly to the media
forever, sometimes the printer requires head cleaning, ink cleaning, and
others that will directs the ink directly to the drain. Hopefully useful and
can add insight, Thank you...
