Have a blog, at least know how to install and change fonts on a blog. Because articles that are easy to read also come from the factor of using fonts or typefaces on the blog. There are many types of fonts that can be used, but not all of them can be used for blogs. Just imagine if your blog or website uses Script typeface, from articles that are interesting to read to not interesting.
Therefore, use fonts for blogs that are simple, clear and firm. Some of the fonts commonly used on a blog or website are Arial, Calibri, Roboto, and Times New Roman. Or other types that can still be nice to see and read.
Choosing a font for display and articles on a blog or website is very important to note. If it is not quite right, it will make readers or visitors to the blog feel disturbed by the appearance of the blog. It's only because of using the wrong typeface that the blog traffic is reduced.
Therefore, use the best font. In addition to the appearance of the blog, the use of fonts that will not interfere with loading the blog. For this blog only use Arial font type. There is no need for additional scripts and can appear neatly and still be comfortable to look at.
If you want to install or change fonts on your blog or website, use a service that really supports your blog. One of the services and perhaps the only one that is often used to select various types of fonts is Google Fonts.
By using the Google Fonts service, you will easily install and replace fonts as you wish. Lots of fonts that can be used and all of them are free or without a penny.
1. How to Use Google Fonts
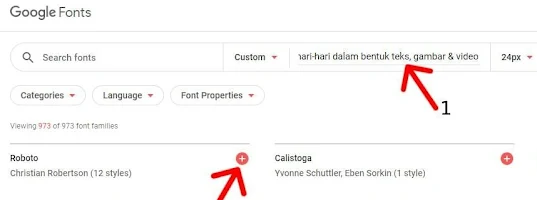
Why should you use the Google Fonts service? This service is the easiest to use. To use fonts on a blog, you only need the CSS code and HTML code which must be inserted into the blog template code. Open the Google Fonts service at https://fonts.google.com Find the font or typeface you want to use. An example is Roboto
After selecting the Roboto font, a special page for this font will appear. Pay attention to the appearance of this Roboto page, there are various menus that you can try yourself. These menus are used to display the appearance of the Roboto font, starting from the shape of the writing, thickness, italics, and so on, which you can try yourself by writing directly.
To use the Roboto font in your blog, pay attention to the thickness and style of the font that will be used. This Roboto font has several styles, namely:
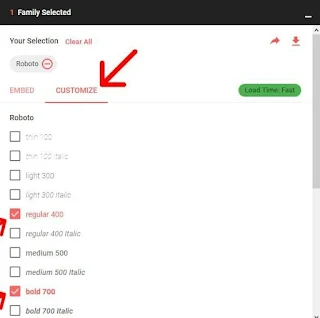
Thin 100Thin 100 ItalicsLight 300Light 300 ItalicsRegular 400Regular 400 ItalicsMedium 500Medium 500 ItalicsBold 700Bold 700 ItalicsBlack 900Black 900 Italic
To use these font styles, just select them as needed. For example, only use the form Regular 400, Regular 400 Italic, Medium 500, Medium 500 Italic, Bold 700, Bold 700 Italic.
The selected Roboto font forms will be entered into the Selected family column and the Used on the web column. In the Used on the web column, there are HTML and CSS script codes for fonts that can be installed and used for your blog or website.
Then how do we change the font size and type in our blog posts? So that the font size is just right, that is, not too big and not too small and the font type is easy to read. The following will explain how to change the font type and font size in posts.
Steps for Changing the Font and Font Size in Blog Posts:
1. Please, friend, log in to your respective blogger buddy account.
2. Click the Themes/Template menu
3. Click edit HTML.
4. Check the expand widget template. Find the following code by pressing CTRL+F
.post-body{ or .post-body {
If you find more than one code .post-body{ or .post-body {, use the one above.
Then to change the type of font / letter in the post use the following code:
font-family:verdana
Then to determine the size of the font / letters in the post use the following code:
font-size:15px;
Then the two codes above, enter right in front of the .post-body{ code
5. Click save template and you're done.
Information:
1. Replace the verdana font with the type of font we like.2. Replace the 15px font size with the font size we like.
The types of fonts most often used by bloggers are as follows:
- Arial
- Verdana
- Taoma
- Helvetica
- Georgian
- Palatine Linotype
- Times New Roman
- Trebuchet MS
- Courier New
I prefer verdana fonts, because in my opinion this type of font is very easy and comfortable to read. Thus the article How to Change the Font and Font Size in Blog Posts. Hopefully it can be of benefit.
2. Changing Fonts in Blogger with Google Fonts
You can use a font that you like and think is good. To use the font, of course you have to look for it first. One highly recommended font provider is Google Fonts, all fonts are available for free and can be used on blogger. In the following, we attach how to use Google Fonts on Blogger.
2.1 Tutorial Changing Fonts in Blogger
1. First, open a browser and then visit the official Google Fonts website.
2. Select the font you want. If you want to see a preview, write text directly in the Type something column, select a font by pressing the plus (+) button to the right of the font.
3. Click on the family selected section at the bottom right.
4. Before use, do a font customization by pressing the Customize button, here you can adjust the thickness of the font that will be used later, just tick your choice.
5. Then click the embed tab again, in the embed section there are 2 things you need to pay attention to, namely embed font and specify in css. Embed font is the code that will be entered in the head section of your blog so that the font can be used, while specify in css, the command that will be used in css to change the font.
6. First copy the code from the embed font, then open Blogger, enter the theme, select edit html, then paste the code between the code <head> and </head>
7. Next, copy the code from Specify in CSS and paste it into your blog in the desired section, for example in the post section or if you want to change the font as a whole, place it in the css body {} code, as shown below.
8. Finally save and see the results by opening your blog.
Note: You can use more than 1 font on Google Fonts, the method is the same as pressing the plus + button, then entering the code provided on your blog in the above way.
3. Conclusion
Fonts will make your website more beautiful and easy to read. By default, the browser will match the font on your computer with the font used on a website or blog. Apart from that, you can also customize the font on your blog.
That's how to use Google Fonts on Blogger. You need to pay attention to the font that will be used, don't let the font distract visitors from reading posts on your blog. Hope it is useful.
Before you close the article, how to change the font type and font size in a post, please leave a comment. Thank You...


