Today's website needs are needed by Internet users. Therefore, lots of people are starting to develop websites with various kinds of content in them.
There is a lot of website content circulating on the Internet, for example, such as government websites, educational websites, technology websites and websites with other discussions. The website is a source of information for the public because it provides a lot of information about anything in this world. You can learn, teach, and even work through a website.
For those of you who are interested in developing a website, then you need to learn about web programming. Because we need expertise to create a website. Likewise with making the interface design.
How to Install Bootstrap on Windows for Beginners
One of the most important things on a website is the interface design of the website. Why ? Because people from various backgrounds will visit your website. So you have to make a website that is user friendly and everyone can operate it. Well, one of the tools that is often used by web developers to create the interface design of a website is Bootstrap.
However, do you know what is meant by Bootstrap? Bootstrap is a framework that we can use to design a website. With Bootstrap, we can create a website display quickly and easily.
Bootstrap already has all types of HTML files and other design templates based on CSS. You can create grids, buttons, navigation and more using bootstrap.
If you want to use Bootstrap, you have to install it first before you use it. Well, there are two ways to install it, namely online and offline. Here's how to install Bootstrap on Windows.
1. Install Bootstrap Offline
To install Bootstrap Offline, you must first download the Bootstrap file. And here's how to install Bootstrap Offline.
- First download the bootstrap file via the official website. Click Here to download the Bootstrap file. Then right click on the file to extract it. Then click Extract Here.
- Next open your text editor. You can use notepad or Sublime. Here I use Sublime Text.
- Then click the File menu in the Sublime application toolbar. Then click the New File menu.
- Then save the file by clicking the File menu and then selecting the Save menu.
- Save the file in the bootstrap folder. Then give the file name index.html. Make sure that you have to give the extension to HTML. Then click the Save button.
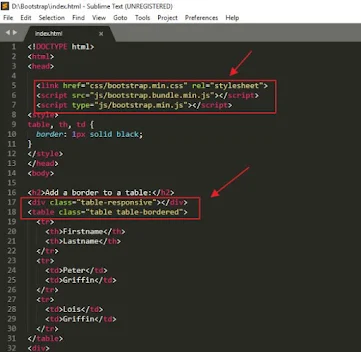
- Then type the script as shown in the image below.
<link href="css/bootstrap.min.css" rel="stylesheet"><script src="js/bootstrap.bundle.min.js"></script><script type="js/bootstrap.min.js"> </script>
In the div and table tags, you can call the class name that has been provided by Bootstrap. You can learn about it through the official Bootstrap page.
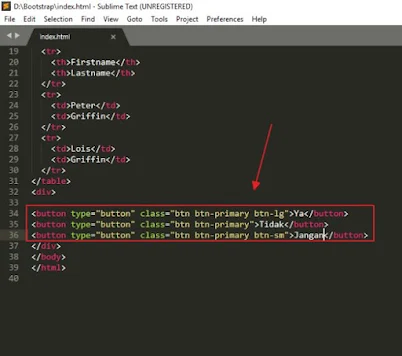
- You can also style the buttons.
- Now you can run the index file in a web browser and see the results. The style on the table and button is the result of the style that we call via bootstrap.
2. Install Bootstrap Online
If previously explained about how to install Bootstrap offline, now I will explain how to install Bootstrap online. Here are the steps.
- Go to the official Bootstrap page and click the Introduction menu which is located on the left side of the website.
- Then look at the Starter Template section. Click the Copy button to copy the script.
- Create a new file called index.html and Paste the script that we copied earlier into the Index.html file.
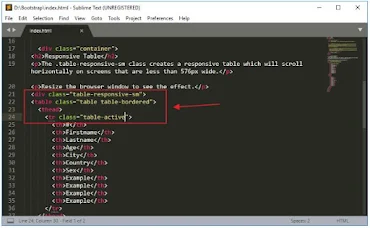
- Now, what is shown in the red box is a script to install Bootstrap online.
- And now you can freely style the components in the HTML file.
- Try to display the index file in a Web browser and see the results.
This is an article that explains how to install bootstrap on Windows offline or online. Hopefully this article can be useful for you.


